
Jenny LCD 3D printer user guide


                         Jenny LCD 3D printer user guide


1. Check
1.1 Check the printer
1.2 Check the components
Please check the printer when express hand it to you. Make sure there is no scratch, damage or distortion, etc.
     Please check if all components are well packed in the box. Please contact us a.s.a.p. if there is any problem.
2. Preparation

2.1 Remove foamed plastics.

2.2 Uplift the Z axis 
2.2.1 Insert the power plug back on the printer.

2.2.2 Turn on the printer. 


 2.2.3 Click touch screen by CONTROL and BACK TO ZERO button, the build platform will automatically move to the top.

2.3 Remove the screen cover

2.4 Settle the resin tank  
Fix the resin tank by four M5 black screws removed from last step at four angles.


2.5 Fix the build platform
2.5.1 Block the build platform 
2.5.2 Fix the platform with screw nut

2.5.3 Release platform direction adjusting screw


2.6 Platform leveling 
2.6.1First, click” back to zero” and make sure the platform is on the top.

2.6.2 Choose100mm and move down
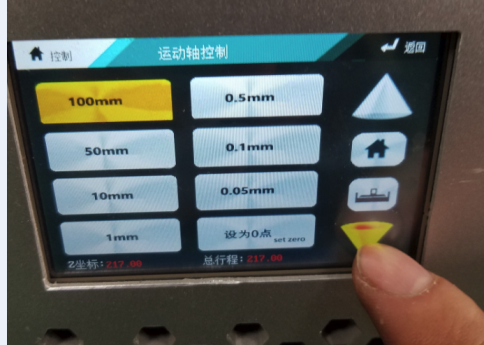
2.6.3 Choose 50mm and move down

2.6.4 Choose 10mm and move down four times. The platform should be moving down 190mm finally.

2.6.5 Continue adjusting and confirm the zero

When platform is stick on the resin tank bottom, the adjusting is finished.

2.6.6 Confirm the zero

2.6.7 Tighten the screw and fix the platform

2.6.7 Finally, click back to the original zone


2.7 Pour resin into the resin tank

2.8
Connect the jennybox back on the printer and turn it on

LAN IP confirms:
Insert cable into Jennybox, and you can use computer, phone or pad to find a equipment called jennybox. Open IP in your browser.


CheckNanodlp JennyPrinter special User guidefor more information.
2.9 Print finished and cover resin tankHand the platform for 5 minutes and let the liquid resin drop down.


Cover the resin tank with protective cover

2.10 Post processing and curing
CheckJenny post curing chamber and post processing User guidefor more information.

Comments

Popular posts from this blog

Jennybox Version 2.3 launching Notice

Jennybox Version 2.3 launching Notice Jennybox 1. Remote access by NAT traversal Realize the access to visit any devices by LAN anywhere only if you can surf on internet. Please check 《 Jenny LCD 3D printer remote visiting by WAN user guide 》 for reference. 2. Use USB flask disk to set Wi-Fi connection If you have no wired network, you need to sign-in and connect to Wi-Fi. Please check 《 Jenny LCD 3D printer wireless user guide 》 for reference. 3. Auto updating for touch screen display UI For better performance, we update the UI (user interface). The updates enable the UI automatically refreshing after users download the Binary files (BIN). Please check 《 Jenny LCD 3D printer touch screen auto-updating guide 》 for reference. 4. LCD panel replacement set Since we update 5.5, 6.33 and 8.9 inch panels, you could change panels by Jennybox based on your needs. This update will work after reboot the printer. 5. Solve the problem that LCD panel has charact

Revolutionary LCD UV Resin 3D printer

              Jenny LCD-3D-Printer     Meet our NEW generation: LCD UV resin 3D printer---Light 1+. This is the latest 3D printing technology after SLA and DLP.       Light 1+ 3d printer use UV light to cure the UV resin layer by layer with high accuracy, and the print speed is much faster than filament printers. Instead of filaments, UV resin enables the prints smoother and much accurate than ever. Here is the technical data for light 1+:        LCD offers constant high speed and precision regardless of how much of the workspace is in use. The print speed is only based on the  height of the 3D model  and the curing time of the resin type. This enables us to print a lot little models the same time, or one big model. LCD highly expand the use of Jewelry design.  Rings, necklaces, bracelets, earrings and other jewelry requires an immense precision a good resin 3D printer can offer. And of course for jewelry munufacturer, the quantity and the quality.                          

3D topographic map by Jennyprint